Are you just getting started with selling items to your Campers?
RoverPass is here to help get your General Store up and running in no time! Your General Store will be pre loaded with a set of most common items our partner campgrounds already sell, you will just have to go in to your Products tab, review the products and decide if you want to change any of those items.
4 Main Functions within your General Store Products:
- View and search for available products listed in your store
- Add new products to your store
- Edit existing products
- Remove products from your store
How-To View and Search Products:
Step 1: Login through the RoverPass Owner Portal Sign In Page
Step 2: Click on the 'General Store' tab in the left hand sidebar navigation
Step 3: Click on the 'Products' tab in the dropdown bar under the 'General Store' tab in the left hand sidebar navigation
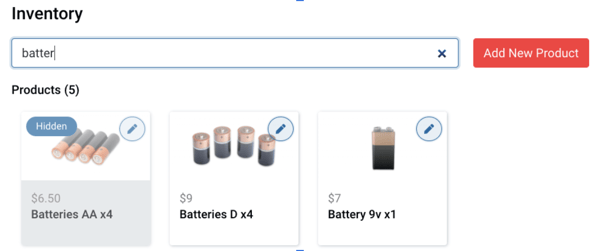
Step 4: Here you will see a list of "Product Cards" for each item/product you have listed in your store, you can also search each product by name using the 'Inventory Search Bar' at the top of the page.
What are Product Cards?
Each product/item sold at your Campground will have a Product Card with the following information:
- Product Name - Displayed in the bottom section of the product card.
- Price - Displayed right above the product name
- Image - Displayed in the top of the product card
- Availability - The availability status of a product will be displayed as a grayed out card with a "Hidden" label at the top.
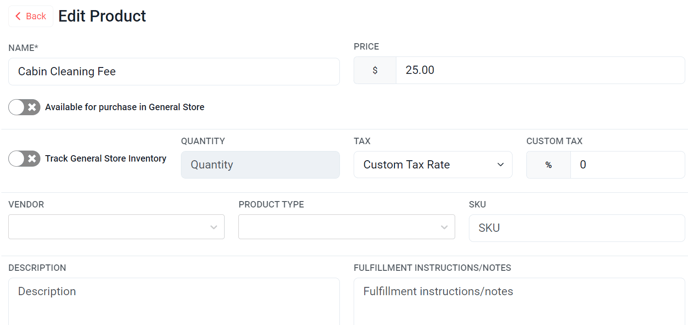
How-To Edit a Product:
Step 1: Click on the 'General Store' tab in the left hand sidebar navigation
Step 2: Click on the 'Products' tab in the dropdown bar under the 'General Store' tab in the left hand sidebar navigation
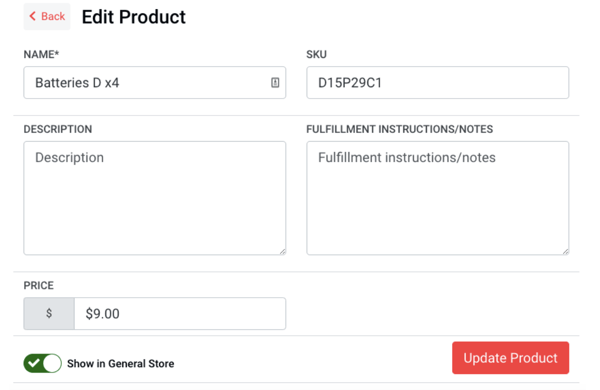
Step 3: Click on the desired "Product Card" you wish to edit, next the 'Edit Product' screen will appear
Step 4: Here is where you can change the details of each of your products such as:
- Name - This is the name of your product/item that will show in your General Store
- SKU - This is where you can add a SKU Number for your product/item
- Description - This is where you can add a description of your product/item
- Fulfillment Instructions/Notes - This is where you can add internal notes regarding fulfillment instruction or any other notes that help you stay organized with each product
- Price - Update the price of your product/item using this field, this price will be shown in your General Store
- Availability - To update the availability of your item/product, use the 'Show in General Store' toggle button. When this switch is off, the product card will show as grayed out, with a "Hidden" label at the top. This product will not show in your General Store when toggled off. (This option is best utilized when you want to hold the sales of an item and not remove it completely from your General Store).
Please note: Right now, the SKU, Description, and Fulfillment Instructions/Notes fields are for your information purposes only, as these fields are not displayed in the General Store.
Step 5: Click the 'Update Product' button to save your changes
How-To Remove a Product from your General Store:
Step 1: Click on the 'General Store' tab in the left hand sidebar navigation
Step 2: Click on the 'Products' tab in the dropdown bar under the 'General Store' tab in the left hand sidebar navigation
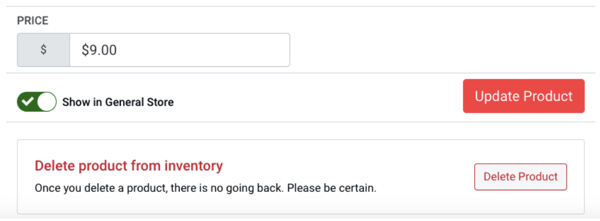
Step 3: Click on the desired "Product Card" for the product/item you wish to delete, next the 'Edit Product' screen will appear
Step 4: Navigate to the bottom of the screen and click the 'Delete Product' button
Please note: Once a product or item is deleted, it will be removed from your General Store. Although, the sales history for any deleted products will still be available.
How-To Add a Product to your General Store:
Step 1: Click on the 'General Store' tab in the left hand sidebar navigation
Step 2: Click on the 'Products' tab in the dropdown bar under the 'General Store' tab in the left hand sidebar navigation
Step 3: Click on the 'Add New Product' button in the top right hand corner of the inventory screen, next the 'New Product' screen will appear
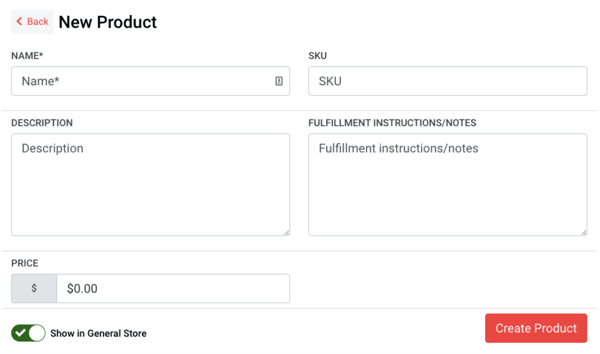
Step 4: From the 'New Product' screen, you will be able to create a new product by entering the following information about the product:
- Product Name - This is the only required field when entering a new product
- SKU - This is an optional internal field
- Description - This is an optional internal field
- Fulfillment Instructions - This is an optional internal field
- Price - If you choose not to enter a price on a product, please note that this product will be listed as "free" in your General Store
- Availability - By default, all new products are turned on as available, you can change this here by toggling the 'Show in General Store' button to off.
Product Images:
At this moment, only prefilled products will have distinctive images related to the product, all new products are going to be entered with a generic image.
How-To Add a Required Product and/or Fee for Checkout:
Step 1: Click on the 'General Store' tab in the left hand sidebar navigation
Step 2: Click on the 'Products' tab in the dropdown bar under the 'General Store' tab in the left hand sidebar navigation.
Step 3.1: If you are creating a new product or fee, click on the 'Add New Product' button in the top right hand corner of the inventory screen, next the 'New Product' screen will appear.
Step 3.2: If your product or fee has already been created, click on the desired "Product Card" you wish to edit, next the 'Edit Product' screen will appear.
Step 4: To make this a required product or fee that will only appear at checkout, toggle off the 'Available for purchase in General Store' option.
Step 4: Toggle on the options 'Available for purchase in Online Checkout' and 'Available for purchase in Reservation Builder', and set them both as 'Required'.
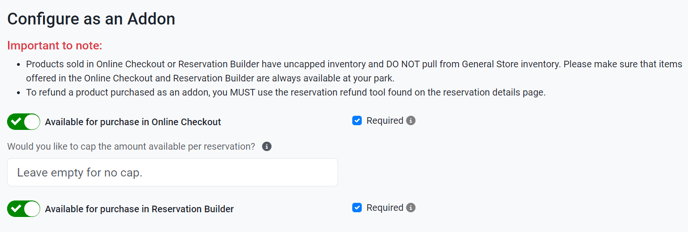
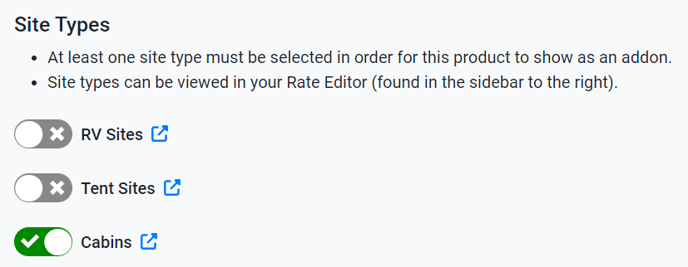
Step 5: Scroll down and toggle on the Site Types where you want this product or fee required.
Step 6: Navigate to the bottom of the screen and click the 'Update Product' button.